


Origami Boomerang
This is a really cool origami boomerang. You throw it away from you and it will fly back towards you! Thanks to reader Luke for emailing us regarding this origami!
Made this origami? Comment and Submit your photo using the comment box at the end of this page!
Origami Boomerang Step 1: Start with a 8.5 inch x 11 inch (21.5cm x 27.9cm) paper, color side down. Printer paper works fine for this origami.
Cut the paper in 2. We'll only use half the paper for one boomerang.

Origami Boomerang Step 2: Fold paper in half on the vertical axis. Crease well and unfold.


Origami Boomerang Step 3: Fold both sides to about 1mm from the center. We'll have to fold the paper in half again later and the 1mm prevents the paper from overlapping.


Origami Boomerang Step 4: Fold the paper in half, bringing the top down to the bottom. Crease well.


Origami Boomerang Step 5: Fold the top right and left corners to the center. Crease well and unfold. Make sure to go over the crease several times. We'll be referring to the creases in the later steps.


Origami Boomerang Step 6: Unfold paper and rotate.

Origami Boomerang Step 7: Unfold the bottom half of the paper.

Origami Boomerang Step 8: The next few steps are all focused on the center of the paper.
Make a small valley fold where indicated below.


Origami Boomerang Step 9: Recrease where indicated into valley folds.
Make sure to go over each crease several times. Good creases will make the later steps much easier.


Origami Boomerang Step 10: Now recrease where indicated into mountain folds.
Remember to go over each crease several times.


Origami Boomerang Step 11: Fold up the upper half of the paper so that it is vertical or perpendicular to the table (instead of lying flat on the table).

Origami Boomerang Step 12: Now hold on to the left side of the paper and move the right side of the paper clockwise until the paper forms a "number 7" shape.
If you've creased the paper well in Steps 9 and 10, then the paper should co-operate and move like in the photos below.


Origami Boomerang Step 13: Fold the lower half of the paper to the right as shown below.


Origami Boomerang Step 14: Fold down the top half as shown.


Origami Boomerang Step 15: Now, we're going to make another valley fold to close up the paper. As you do so, you'll need to tuck the tip into the upper right corner pocket.


Here's the tip getting tucked into the upper right corner pocket. Make sure the paper stays flat as you slide it all the way into the pocket.


Origami Boomerang Step 16: Almost done! Next we need to work on the bottom half of the paper.

Pry the paper open a little. Fold both corners to the center. Crease well and unfold.


Origami Boomerang Step 17: Use the crease to make an inside reverse fold on the left side only.
Check out the link if you're not familiar with inside reverse folds. It's a commonly used technique in origami.
Basically push in the left corner tip so that it sits in between the 2 layers of paper.


Origami Boomerang Step 18: Now tuck the right tip into the left pocket. Make sure the paper stays flat as you slide the tip in.


Origami Boomerang Step 19: We'll now do the same for the top end of the paper.

Pry paper open slightly and fold both sides to the center. Crease well and unfold.


Origami Boomerang Step 20: Make an inside reverse fold on the top side.

Origami Boomerang Step 21: Now tuck the tip into the pocket.


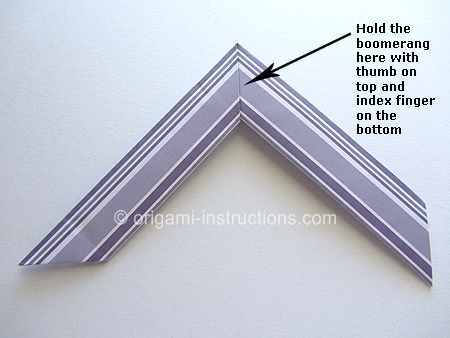
and your origami boomerang is complete!

Hold it in the middle with your thumb on top and index finger on the bottom. Throw it by twisting your wrist (not your arm), like you're throwing a frisbee, upwards and away from you.
Since it's so light, there can be no wind or fan in the room.
It also works better in a room with high ceiling.
If you're in a room with vaulted ceilings, stand on the lower end and launch it towards the higher end of the room.
Here's a picture of a real boomerang from Australia with the origami version. The real boomerang is made out of wood, heavy and can really hurt someone if thrown improperly.
The origami version is lighter and definitely safer!
