Origami Rose
This origami rose is an easy flower to fold. It uses four pieces of origami paper: three for the rose petals and one for the leaves. Roses are the flowers of choice for Valentine's Day and any other special occasion. Did you know that different rose colors have different meaning?
Made this origami? Comment and Submit your photo using the comment box at the end of this page!
Red Roses symbolizes love and romance, beauty and perfection. Pink roses symbolizes grace and elegance, admiration, appreciation and joyfullness.
Yellow roses provide warmth and happiness, joy and friendship.
White roses symbolizes innocence and purity, honor, reverance and rememberance.
Orange roses show desire and enthusiasm, passion and excitement.
Lavender roses are for the fairy tale romantics. They symbolize enchantment and love at first sight.
Now that you know their meaning, pick the right color of origami paper and start folding!
If the rose is to be red, use three pieces of square paper, of different sizes.
The second red piece is about 3/4 the length of the first, and the third is about 3/4 the length of the second. (We ran out of red so we used a pink piece).
The green piece for the leaves is the same size as the largest red piece.
Now that you have your paper all lined up, let's get to folding! Just follow the origami photo digrams step by step and you should be rewarded with an origami rose at the end!
Origami Rose

Each of the red pieces will be folded the same way.
Start with an origami square base. Next fold the right corner of the base to the centerline, then unfold.


Now fold the edge onto the crease mark you just made, as shown below. Then fold that corner again.


Repeat on the left corner, then on the two corners on the back of the piece.
Then fold the right edge to the left as shown, and repeat on the back side.
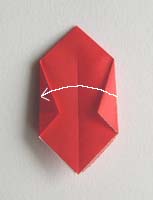
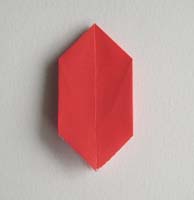
Now open up the piece with your fingers.
It helps to push slightly on the bottom of the piece, collapsing and rounding it a bit.
Now take the other two red pieces and make the same shape.


Now with the green piece of paper, make an origami lily!
This may seem like a strange thing to do, but you'll see why in a second.
You now have three rose petal forms and a lily form:

Nest the rose petal forms inside each other.
Then place the lily form at the bottom, where it becomes the mini "leaves" (technically, the calyx) of the rose.
We find it helpful to use a few spots of glue to hold the parts together.
And there you have it, an origami rose!

Check out the many origami rose photos that have been submitted by our readers!


