Origami Kusudama Butterfly
Origami kusudama butterfly is another pretty kusudama flower by Makoto Yamaguchi. The "butterfly" name was probably given by the designer. This one requires more effort. You've to move layers around back and forth and even folding and unfolding the entire paper. We therefore consider this to be an intermediate origami. You've to make a total of 5 units to form the flower.
Made this origami? Comment and Submit your photo using the comment box at the end of this page!
Origami Kusudama Butterfly Step 1: Start by folding a waterbomb base. This is a commonly used base in origami and we've created a separate page of instructions for it.
You should have the following to start with.

Origami Kusudama Butterfly Step 2: Fold the top layer from the right to left.
By doing so, you now have 3 layers on the left and one on the right.


Origami Kusudama Butterfly Step 3: As mentioned earlier, you now have 3 layers on the left and one on the right.
From now onwards, we'll be making a series of folds that will be repeated for each of the 3 layers on the left. We won't be doing anything to the layer on the right.
Fold the top layer on the left to meet the center crease.
Crease well and unfold.


Origami Kusudama Butterfly Step 4: Pry open the top layer on the left and bring it to the center and press it flat, making a squash fold.


Origami Kusudama Butterfly Step 5: Fold the left half over to the right.


Origami Kusudama Butterfly Step 6: Repeat Steps 3 to 5 for the other 2 layers on the left.
When completed, your paper should now look like this.

Origami Kusudama Butterfly Step 7: Move the layers back to the left.


Origami Kusudama Butterfly Step 8: We're now going to start another series of steps that will need to repeated for each of the 3 layers on the left.
Make a diagonal fold on the top left layer.


Origami Kusudama Butterfly Step 9: Move the top left layer from the left to right.


Origami Kusudama Butterfly Step 10: Fold the upper left layer from the left to right.


Origami Kusudama Butterfly Step 11: Make a diagonal fold as shown below.


Origami Kusudama Butterfly Step 12: Move the upper layer from the right to left.


Origami Kusudama Butterfly Step 13: Fold up the bottom tip.


Origami Kusudama Butterfly Step 14: Fold the left half over to the right. This completes the series of steps for the first layer on the left.


Origami Kusudama Butterfly Step 15: Repeat Steps 8 to 14 on the other 2 layers on the left. When completed your paper will now look like this.

Origami Kusudama Butterfly Step 16: Here comes a very interesting step....Unfold your paper! Yes, that is not a mistake!

Origami Kusudama Butterfly Step 17: Push down the paper in the center to invert it.


Origami Kusudama Butterfly Step 18: We're now going to fold the paper back up.
We're going to use the existing folds as is. So if it is a mountain fold, it will stay as a mountain fold. And if it is a valley fold, it will stay as a valley fold.
The paper should move easily into position.
Once again, the steps will have to be repeated 3 times, one for each layer.

Starting with the first layer, see the valley folds A-C and A-D?
Move them towards each other so that they sit right under the center line A-B.


Origami Kusudama Butterfly Step 19: Now fold and tuck B-E and B-F under the center line A-B as well. Remember, we're not making any new creases, just using the existing ones.


Origami Kusudama Butterfly Step 20: Fold down the top tip.
This completes the series of steps for the first layer.


Origami Kusudama Butterfly Step 21: Repeat Step 18 to 20 for the other 2 layers.
Here's the first and second layer completed.

When all 3 layers are completed, you've then completed the steps for one petal.

Origami Kusudama Butterfly Step 22: Repeat Steps 1 to 21 and make a total of 5 units.

Origami Kusudama Butterfly Step 23: Bring 2 units together and glue them together where indicated.


Origami Kusudama Butterfly Step 24: Repeat Step 23 for the other 3 units.
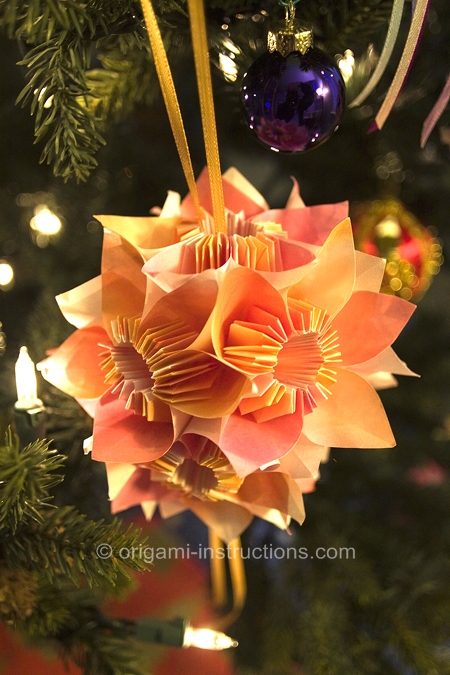
Here's the completed origami kusudama butterfly! You can make a total of 12 of these flowers and glue them together to make 1 kusudama ball.

The center is extra special...

Side view...

Wayne in Citrus Heights made the kusudama ball and used it as a christmas tree ornament! It looks very pretty, doesn't it? Thanks, Wayne for taking the effort and sending in your photo!