Origami-Instructions.com      spreading joy one fold at a time

Search this Site

Custom Search


Like Origami? Tell your friends!


Most Popular Origami

These are currently our most popular origami:

origami-lily       origami-dragon


origami-crane       origami-frog


Origami Paper

We use standard size 6 inch x 6 inch (15cm x 15cm) square origami paper for this site unless stated otherwise. If you can, use different types of origami paper to change the look of the finished origami and have fun with it!


Translate this Site


Origami Kawasaki Rose, Part 2

Here is the second of two (2) parts in our instructions for folding the Kawasaki Rose.


Made this origami? Comment and Submit your photo using the comment box at the end of this page!


Don't forget to check out our Kawasaki Rose Video, which may help clarify some of the steps.


Flip the paper over so the colored side is up. Now fold point A through 90 degrees, as shown in the next ten (10) photos:

32-origami-kawasaki-rose

33-origami-kawasaki-rose

34-origami-kawasaki-rose

35-origami-kawasaki-rose

36-origami-kawasaki-rose

37-origami-kawasaki-rose

38-origami-kawasaki-rose

39-origami-kawasaki-rose

40-origami-kawasaki-rose

41-origami-kawasaki-rose

42-origami-kawasaki-rose

Now partially unfold the paper, rotate it 90 degrees clockwise, and fold point B 90 degrees as shown:

43-origami-kawasaki-rose

44-origami-kawasaki-rose

45-origami-kawasaki-rose

46-origami-kawasaki-rose


Repeat the 90 degree fold for points C and D, after which your origami paper will look like this:

47-origami-kawasaki-rose

Now overlap points A, B, C and D along the same line, while curling the paper to form a cylinder, as shown in the next five (5) photos:

48-origami-kawasaki-rose

49-origami-kawasaki-rose

50-origami-kawasaki-rose

51-origami-kawasaki-rose

52-origami-kawasaki-rose


Place the paper cylinder in one of your palms as shown, with the bottom sticking out as shown. Start folding the bottom flaps inwards as shown, along the creases.

53-origami-kawasaki-rose

54-origami-kawasaki-rose

55-origami-kawasaki-rose

56-origami-kawasaki-rose

57-origami-kawasaki-rose

58-origami-kawasaki-rose

59-origami-kawasaki-rose

The last flap gets tucked under the previous ones, to close off the bottom of the piece.

60-origami-kawasaki-rose

61-origami-kawasaki-rose


Next turn the rose bud around so you have access to the top.

62-origami-kawasaki-rose

63-origami-kawasaki-rose


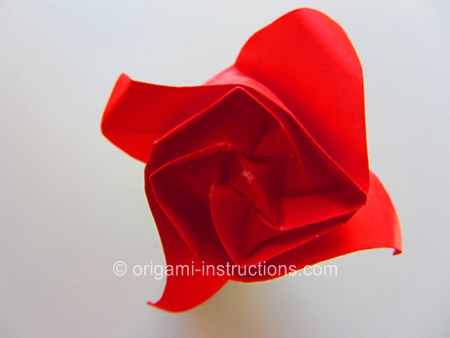
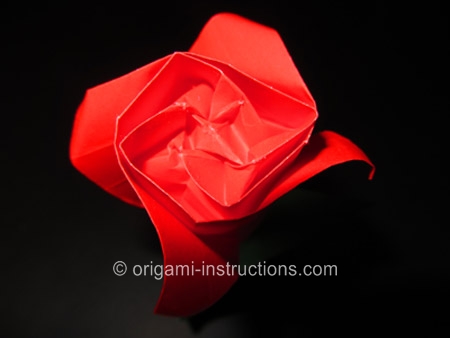
Reach into the center and gently pull outwards to open the inner petals:

64-origami-kawasaki-rose

65-origami-kawasaki-rose


Curl the four (4) outer petals as shown:

66-origami-kawasaki-rose

67-origami-kawasaki-rose

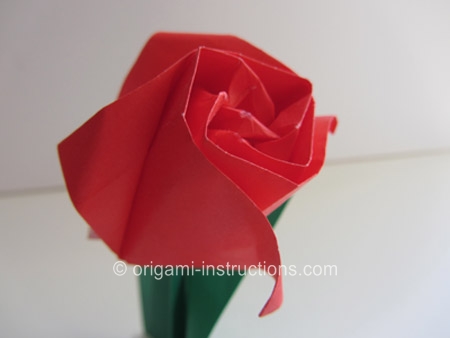
Now your origami Kawasaki rose is complete!

68-origami-kawasaki-rose

69-origami-kawasaki-rose


If you like, you can add a leaf with stem for a nice finishing touch:

70-origami-kawasaki-rose


Check out the many origami kawasaki rose photos that have been submitted by our readers!


Did you make this origami? If so, upload your photo (2MB limit) via the comment box below. You can login with your Facebook, Twitter, Google or Yahoo accounts.